
Advanced Options and Language Definition
Help Version: 3.15 - 23/MAR/2021
Main Options
The Main Options of Builder's Heaven are oriented to Create New Language. Every Language has a specific folder and a complete set of Flags, Custom Codes, and so on, without forgetting a specific M.P.S.C. file.
Here follow a short tutorial based on steps.
Create New Language
STEP1: When there is the need to create a new Language and in this panel you will do it. Probably the language will derives from a previous language that is very similar, so the best thing at first is to select the similar language from the Drop Down list. By this way you will inherit its setup.
Otherwise you can edit the setup of the language clicking "Edit Language Config File" and configure manually every parameters.
STEP2: The interface you see show the most important content of the "Edit Language Config File". It's just a part. Once selected a language from the Drop Down Menu, click "Create New Language" to start creation of a "Derived Language". Edit Selected Language enable the editing controls, Delete remove the language from the lists and Import open archive directory to find a setup file.
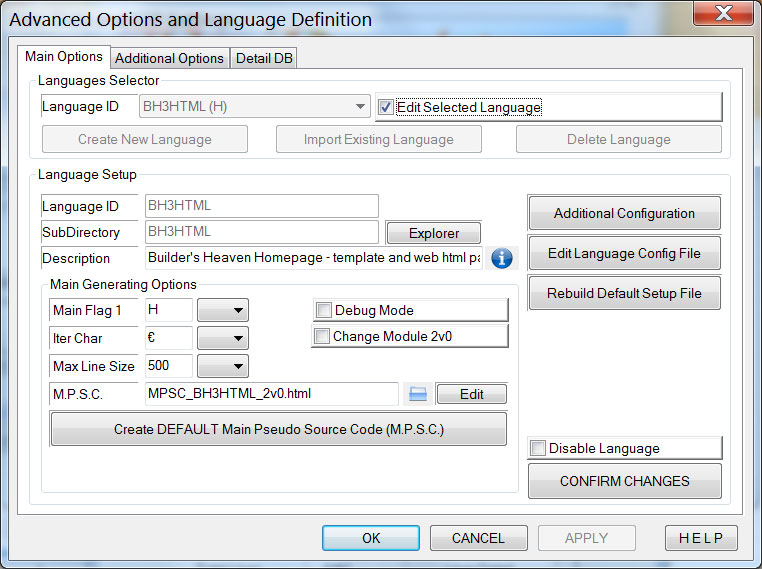
STEP3: you are now into the Edit part of the language. The most important things to define are:
- Main Flag 1: this is the Flag1 of every rows of the M.P.S.C. Code. A Drop Down suggest most common Flag 1.
- Iter Char: this is a WildCard NOT used in any case in your language. Default suggest to use the 'euro' sign because it's easy to reach in keyboard (Alt_Gr+E) and it's not used in any language as a keyword. This character is used to transform iterable rows in number and resolve unique names (i.e.: TEST105 became TEST1, TEST2, ..). A Drop Down suggest most common Iter Chars.
- Main Pseudo Source Code: this is the most important file you have. Refer to Advanced User Guide for details. In this panel you can create a default M.P.S.C. that comes with some example code and the informations you have specified during this setup. So Flag1 assume your Main Flag 1 character, and so on.
- Rebuild Default Setup File: new languages requires a default setup to be used. Click "DEFAULT Language Setup" to create a default file for using this language (see also: New Program Setup section).
STEP4: The other options are just a bit less important. Max Line Size insert carriage return to every line of code and a common list is offered inside the combo box.Change Module 2v0 converts Key To Value processes preserving the space, keeping the code aligned.Debug Mode doesn't clear meta informations from the final code in order to debug your M.P.S.C. file with an easy feedback inside generated programs.
STEP5: A set of Additional Configuration option allow you to better customize the interface accordingly to the language you are building. Refer to the section below for details.
STEP6: To confirm modification use the Button "Confirm Changes". Your Language setup will be saved.
STEP7: When a new Language is created, a new directory with its name is created inside the "archive" general directory. Inside this sub-directory there will finish your setups and your generated languages.
Import Existing Language
STEP1: When you download a new language, from Builder's Heaven homepage or you receive a language from a teammate, you have to unzip the file inside the Archive directory (default is c:\Builder's Heaven\Archive). There you will find also the others languages subdirectories.
STEP2: Now press the button "Import Existing Language". If there are new languages setup inside the archive direcotory, a list will appears showing all the uninstalled languages, otherwise an message error will appear.
STEP3: From the list of new languages check all the ones that you want to import and click OK to complete.
Delete Language
STEP1: Select from the Language ID Dropdown the language that you want to remove.
STEP2: Confirm. The language will be logically removed. For ease the Archive directory will open; is up to you to archive the deleted language directory or to move it into a backup elsewhere.
TIP: You can exchange your best languages with your teammates just zipping the Language Directory from the Archive Directory.
Additional Configuration
Building a new language requires a good interface that allows the users of that language to select only the options implemented.
So, accordingly with your M.P.S.C. , this Dialog let you configure the Main Interface involved in the programs setup.
As you can see it is very similar to the Base Parameters Dialog, divided into the same sections. Enable or Disable the sections using checkboxes. This means for example that if you are not planning to implement the IO flags inside your M.P.S.C. , there is no need to enable this area, and so on.
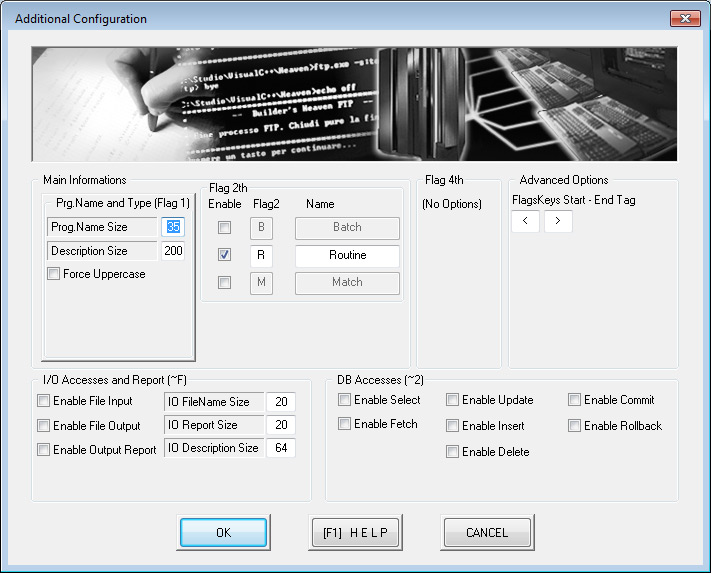
Here a list of the options:
- Main Informations specify the size limit for program names and description, and force uppercase for program names
- Flag 2 you can enable at maximum 3 options and specify the second flags and relative description. This must be mnemonic to the purpose in the matrix file to work properly. Flag 2 is just a line of M.P.S.C. with Flag1 as the main Flag and the Flag2 as you define here. At least a Flag2 must be activate for every program. Refer to Advanced User Guide (Flags) for Flags comprehension.
- Flag 4 no options
- Advanced Options - FlagsKeys set the open and close characters for the automatic recognition of Keys (feature included in the Custom Flags Panel).
- I/O Accesses and reports enable or disable the selection of this box and the limit size for filename and description. Enabling this area means that you have to implement M.P.S.C. accordingly. Refer to Advanced User Guide (Flags) for Flags comprehension.
- DB Accesses enable or disable the selection of this box. Enabling this area means that you have to implement M.P.S.C. accordingly. Refer to Advanced User Guide (Flags) for Flags comprehension.
Additional Options
Additional Options of Builder's Heaven are oriented to enable or disable some features.
Here a list of the options:
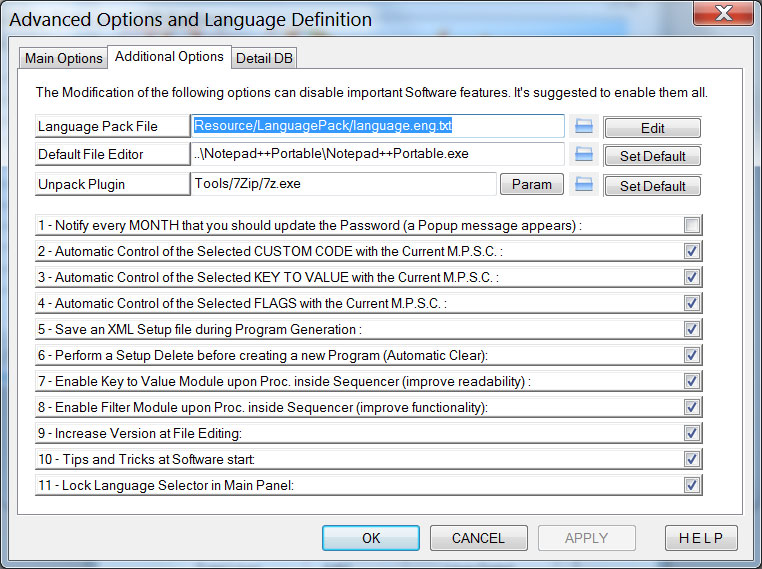
- Default Text Editor to open source file like M.P.S.C. , Custom Code, etc. In case this editor is not found, the Windows Notepad will be used.
-
Language Pack specify the localization file to convert the Software masks, errors messages, etc. You can also edit and convert this file in your language, and hopefully send it to the homepage admin (refer to Builder's Heaven Contact Page); it will be shared to other users after validation.
-
Unpack Plugin allows the Software to decompress a zip file into the publish directory. This plugin enables the UNPACK command in File Cutter module. Specify a valid unpackaging module (like 7zip for example) and check the parameters to enable decompression. Two special Tags inside PARAMETERS are used to resolve the Path of the Archive file inside the Resource directory ("<ZIPSOURCE>"), and the path of the Publish directory ("<PUBLISHDIR>").
- This option check the clock and advise with a pop-up when you are entering a new month, to remember you to change the Password of your Mainframe informations.
- This control activates the automatic check of selected Custom Codes when you exit from that menu. All the Tag of your selection are compared with the current M.P.S.C. to verify their correctness.
- This control activates the automatic check of selected Key to Value when you exit from that menu.All the Tag of your selection are compared with the current M.P.S.C. to verify their correctness.
- This control activates the automatic check of selected FLAGS when you exit from that menu.All the Flags of your selection are compared with the current M.P.S.C. to verify their correctness.
- This option enable the automatic save of current Configuration Setup during the generation of a program.The name of the Setup is the same as the Program Name, but differ by the extension "XML".
- This options allow you to automatically clear the configuration meta-data when you are creating a new Program. When you hit the confirmation button the previous settings will be purged.
- This option comes only for Sequencer module and allow to see the PROC names applying the Key to Value you've defined till now inside the others panels. If, for example, a PROC is declared inside the Pseudo code as PROC-CURS-1S, it will be converted into PROC-CURSOR1 if the cursor name number 1 as been declare as CURSOR1. This improves the readability about your Procedures. It's obviously suggested, as Sequencer says, to enter inside this module at the end of every setup in every other Builder's Heaven panel.
- This Sequencer option enable a filter module with the target to clear from the PROCs various defects that invalidate the syntax of the Calls to PROCs itself; this kind of "defect" derives from the process of identification of the PROC based upon EURYSTIC mode, reading the M.P.S.C. file.For example, if a PROC id is "PROC-CURSOR1:", Builder's Heaven read Clear Keys such as "REXX_PROC_FILTER_001=:"; at this point Builder's Heaven clear the ":" from the Rexx Proc-names.It's possible to add more Clear Keys increasing the number.
- This Options increases the version of the files every times they are opened. This happens to Custom Codes, and M.P.S.C. .
- This Option enables Tips at the start of the software.
- This Option freezes the combo Language selector inside Base Parameters panel, assuming that you change the language just from the Load Setup Button. It prevents the language switching errors.
Detail DB Options
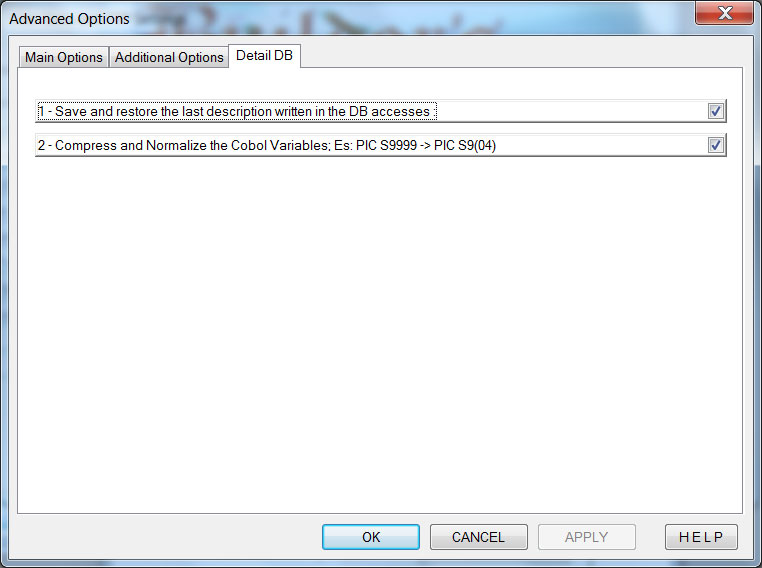
These options only refer to Mainframe Programming (i.e. Cobol).
- This option allow you to saves inside the DCLGEN Cobol, downloaded for DB accesses, some metadata written during the use of that table. Usually every accesses of a DB Table is done to extract a specific type of data, and this means that the descriptions could be very similar one another. Saving this kind of metadata inside a DCLGEN offers, next time you will use it, an automatic label in description edit box.
- This option executes a Picture compression for Cobol variables that consist of a series of "9" (es.: S9999); the conversion returns a more readable Picture (ex: S9(4) ). This module normalize the code and improve the readability.
Advertising