
Custom Flags
Help Version: 3.15 - 23/MAR/2021
Custom Flags Description

Builder's Heaven Flags feature is a user-friendly way to activate portion of code from the M.P.S.C. .
Only checked rows will change your generated program.
The main purpose is group elements of your code that have a specific scope, and activate or deactivate them considering the requirements of your program. For example, after you have defined a standard and empty HTML template, you could decide for a specific page to activate a Javascript, or to apply a CSS, or to insert a special box that only some kind o pages have, an so on..
The definition area of Flags is always from Byte 1 to Byte 6 of your M.P.S.C. . Builder's Heaven read every new sequence, and comparing to user selection from the Custom Flag Dialog, enables or skip the code row at the right of the flags.
Here follows the list of every control:
Flags Collection Area (Top): list of selectable collections.
- List Click: Select a Collection and enables Keys Area
- List Double-Left-Click: Create/Edit selected collection
- List Double-Right-Click: Edit FlagsKey File if exists or start automatic recognition.
- Search Box: Filter the list looking for the search argument
- Create/Edit Collection: Select a line from the List and press this button to create a new Flag Collection or to edit a previous one. You can also Double Click the Line.
- Edit FlagsKey File: Open the file of FlagsKeys associated to the current Flags collection; button enabled only if file exists.
- Refresh List: Reload the entire list and provide update of titles and columns data.
- Select/Deselect All: Enable or Disable all check boxes.
- Rows: Increase or decrease the number of lines.
- Delete Selected: Remove from your drive the checked collections.
Flags List Area (middle): list the flags included inside one collection
After you select a collection, you can start to insert and modify the contained Flag list.
- List Click: Select a Flag and enable editing area below
- List Double-Click and: Edit the Flag Description and Iterable Status. Iterable status allow a flag to be locked at 1 repeat (by default flags are Iterable)
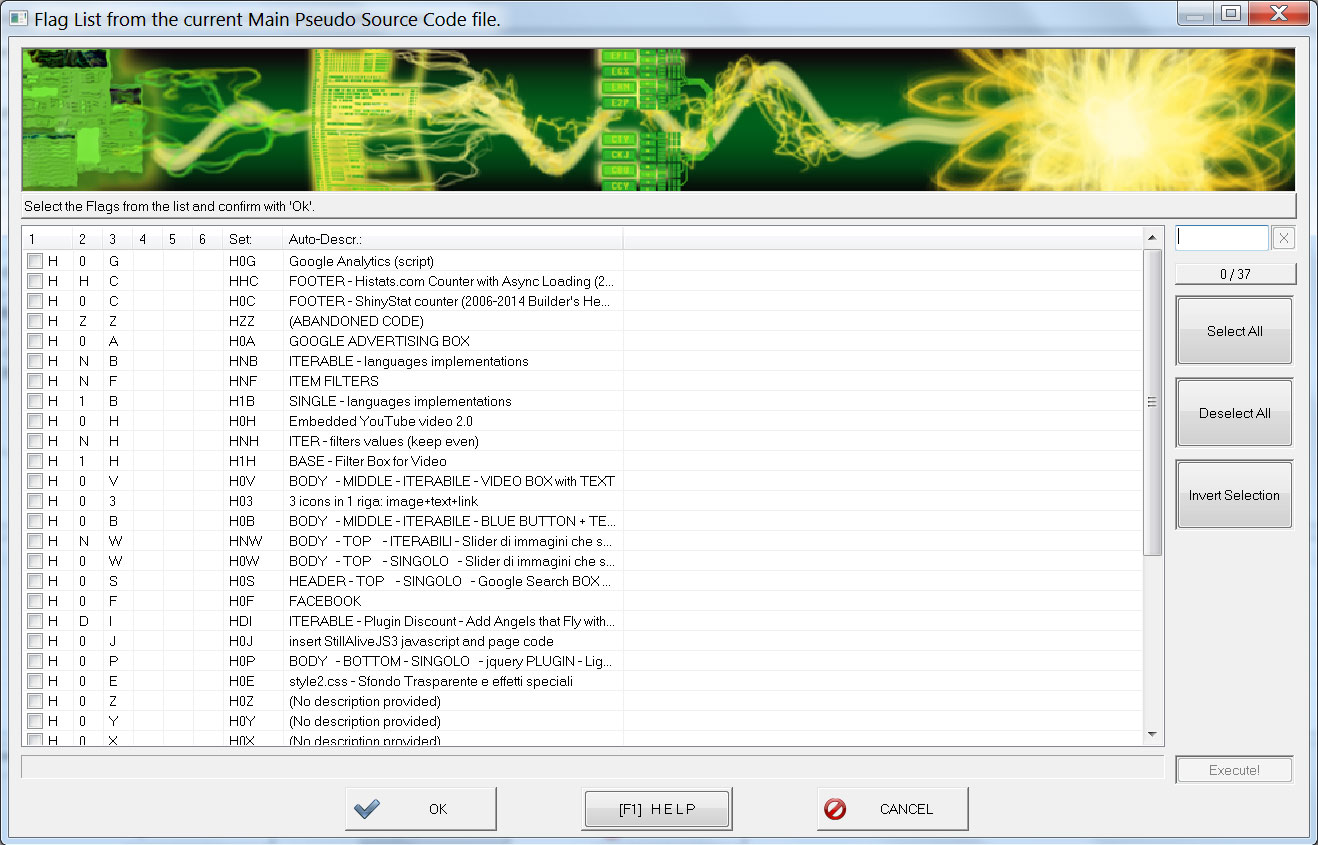
- Add Flags to Collection: Open an extraction of Flags derived from your current M.P.S.C. , and let you select some combinations to add.
- Extract FlagsKeys File: Start automatic recognition of keys that works like Key To Value and creates the FlagsKeys file. Refer to FlagsKeys technical documentation for details.
- Quick Extract FlagsKeys File: as the previous button but avoid the intermediate dialog; it directly opens the Text Editor.
- Edit Main Pseudo Source Code: Edit your current M.P.S.C. in order to write new code lines inside and create new Flags combinations (after saving file you will be able to add the new combination with Add Flags to Collection button).
Selected Flag Area (bottom): current Flag edit area
- Selected Collection: Show the selected flag collection file in edit
- Selected Flags: Show the selected flags in edit
- Editbox Iteration: Changes the iteration of a Flag. Changes are applied at push of TAB button.
- Add/Subtract buttons: Quickly change iterations number in charge.
- DropDown Iteration: Quickly change the iteration number in charge.
- Delete Flag: Removes selected FLAGs from the Collection.
- Apply On Checked: Apply textbox modification to all Checked Flags if checked.
- Button Edit Description and Iterable: Edit the Flag Description and Iterable Status. Iterable status allow a flag to be locked at 1 repeat (by default flags are Iterable)
- Define Flags Descr.: Edit the dictionary file that contains all Flags descriptions.
Flags Technical guide
How can I create a new Flag for my purposes?
To insert new Flags inside the M.P.S.C. file follow this simple instructions:
- Create a Flags Collection and select it
- Check your collection to ensure it will be used in the next program
- Click button Insert New Flags in Main Pseudo Source Code. A text editor should open.
Example (HTML language):...
H
H
...
- Create a new empty Row
Example (HTML language):...
H
H
...
- Define the 1st character, that is the Language character (ex. H)
- Define the 2nd and 3rd characters, selecting from combinations not previously used and excluding System Flags (refer to Advanced User Guide for system Flags)
Example (HTML language):...
H
HAA
H
...
- Go to Byte 7 and start to write your code line.
Example (HTML language):...
H
HAA <!-- Insert CSS wh...
H
...
- Optional: if you need to write more code lines just duplicate this row. Remember to keep together the sequence of your flags in order to let Builder's Heaven engine to identify this portion as a group. In fact every group is duplicated as many instances for this flag are selected from the interface.
Example (HTML language):...
H
HAA <!-- Insert CSS when Flag HAA is enabled... -->
HAA <link rel="stylesheet" href="css/style2.css" type="text/css" media="all" />
H
...
- Save the M.P.S.C. and return to Builder's Heaven
- Click on Flag Collection to select it
- Now Click the Button Add Flags to Collection and find HAA, then check it and press Ok
-
- You will find that HAA has been added to the collection, and its default iteration is 1. More complex Flags definition can use greater iterations and the portion of code will be duplicated more times. In this cases the use of the iteration character is very important to distinguish the instances
- Double Click the Flag HAA to insert a Description as: "Enable CSS style2 to my page"
- Generating the code, now will include HAA Flags Row!
FlagsKeys Technical guide
FlagsKeys is a feature that works as Key To Value does, but is strongly associated to a single Flag Collection. For example, if you create a portion of code rows inside your M.P.S.C. that "lists images with description", you would like to edit for each instance the Image url and the Image description. FlagsKeys covers this kind of function: automatically detects Keys from M.P.S.C. , creates an edit file and assumes your values.
In order to set up FlagsKeys it's necessary to use the "open and close FlagsKeys characters" inside the M.P.S.C. . The most common open and close characters are "<" and ">" but they can be freely changed inside Advanced Options - Additional configuration for each language setup. After that FlagsKeys will be automatically identified from the M.P.S.C. if the following syntax is mantained.
FlagsKeys syntax
<HAA_€_IMAGE_DESC>
Explanation
<HAA_€_IMAGE_URL>
- "<" and ">" are the open and close characters
- "HAA" is a verbose reference to the FLAG selected by current collection;
- "€" is the ITER CHAR for this language (read more..); Because Flags generates iterations of themselves, you have to put the iter char in the keys to resolve the final source generated.
- The rest of the name (ex. "_IMAGE_DESC") is free for user edit and should be sufficient to suggest the value to insert (Ex. _IMAGE_URL expect an image url, _IMAGE_DESC an image description and so on..)
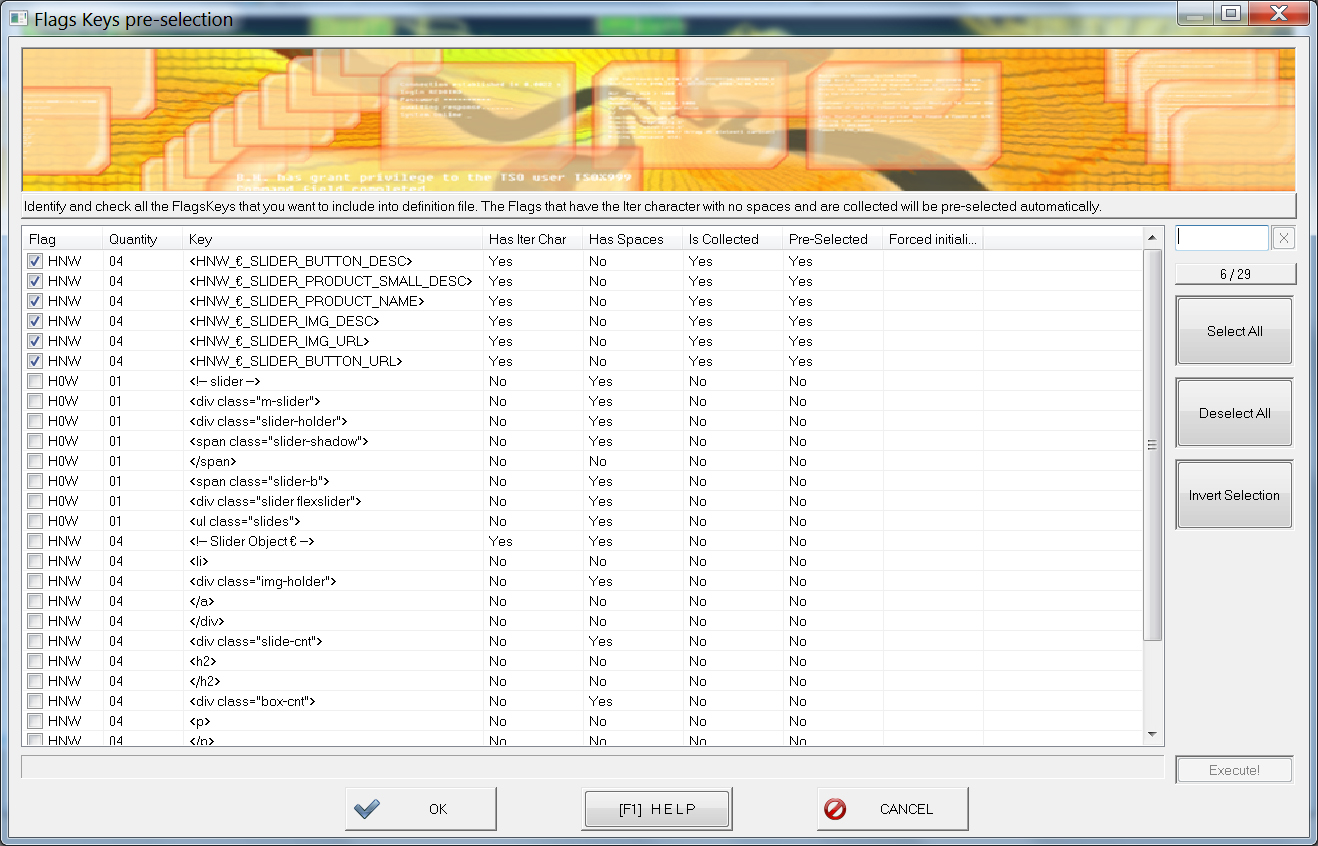
Automatic extraction of FlagsKeys get from M.P.S.C. the rows that have Flags Collection list (Ex. "HAA", "HAB", "HAC", etc). After that a dialog pre-select the keys that follows previous directives, looking for open and close characters ("<" and ">"). After the itermediate dialog is completed, we have to Edit the values inside the file.
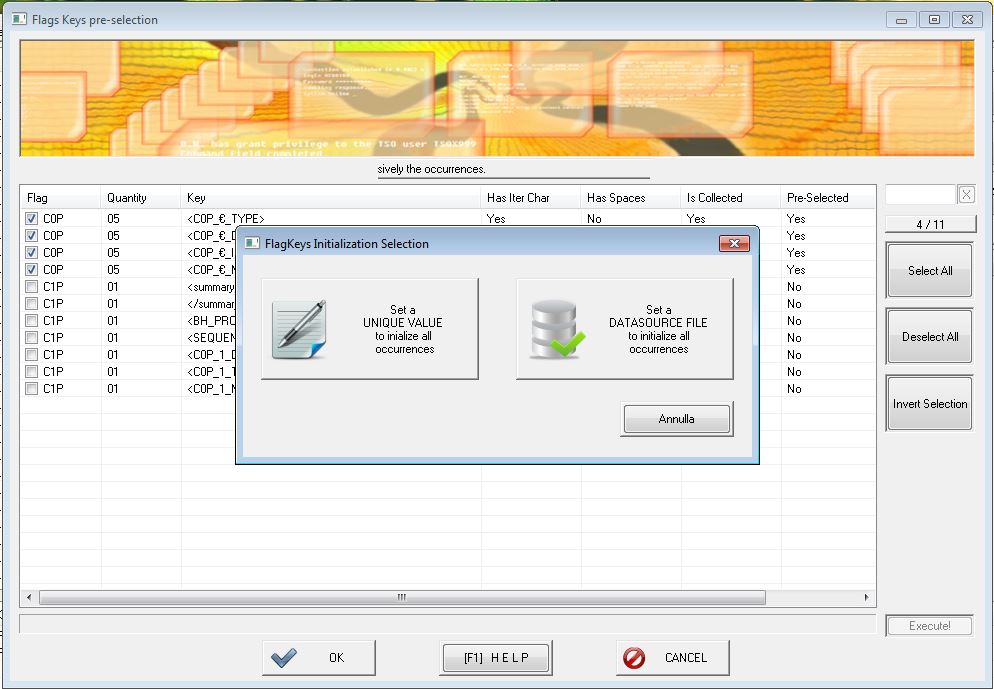
Tips: Inside the Pre-Selection FlagsKeys Dialog, DOUBLE CLICK on a Keys to edit (or force) all the initialization value of its instances. The initialization shows a panel that offers a single text that initializes all the occurrences (first option), and a "Datasource File" that initialize 1 per row occurrences.
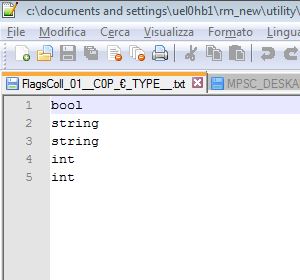
"Datasource File" is an option that result useful when you have HUNDREDS OF OCCURENCES, and a convenient Excel/TXT source with the corresponding values, that could be for example: descriptions, types, variables names, variable values etc. This options apply to every FlagKeys you have selected with Datasouce file, creating a temporary file that will be applyed when you confirm the panel. Every row, starting from first, will initialize the corresponding FlagKeys row. Activating Datasource file will show inside the FlagKeys Row a special Tag: "(Datsource File)", instead of the fixed initialization string o the null valute (no initialization).
Let's see a practical example of how they works; In our M.P.S.C. we have these 2 rows.
FlagsKeys definition in M.P.S.C. (HTML language):
								...

								H

								HAA   <!-- image€ -->

								HAA   <img class="image€" src="<HAA_€_IMAGE_URL>" alt="<HAA_€_IMAGE_DESC>">

								H

								...
Now we select a Flags Collection that contains "HAA" Flags with Iter Char at "3", and we click "Extract FlagsKeys File" button. A working dialog pop up and the automatic recognition of keys will check these results:
- <HAA_€_IMAGE_URL>
- <HAA_€_IMAGE_DESC>
Now FlagsKeys file opens, showing 3 instances as follows. They have been converted into "3" real Key To Value instances.
FlagsKeys definition in FlagsKeys file (HTML language):
								desc_key2value=FlagsKeys definition file: edit the values of the following keys


								// HAA 1

								<HAA_1_IMAGE_URL>=

								<HAA_1_IMAGE_DESC>=


								// HAA 2

								<HAA_2_IMAGE_URL>=

								<HAA_2_IMAGE_DESC>=


								// HAA 3

								<HAA_3_IMAGE_URL>=

								<HAA_3_IMAGE_DESC>=
We can edit the value and expect the results in the final code.
FlagsKeys definition in FlagsKeys file (HTML language):
								desc_key2value=FlagsKeys definition file: edit the values of the following keys


								// HAA 1

								<HAA_1_IMAGE_URL>=images/dusk.jpg

								<HAA_1_IMAGE_DESC>=Dusk Software


								// HAA 2

								<HAA_2_IMAGE_URL>=images/Ibs.jpg

								<HAA_2_IMAGE_DESC>=Infusible Brain Soft.


								// HAA 3

								<HAA_3_IMAGE_URL>=images/nanotech.jpg

								<HAA_3_IMAGE_DESC>=NanoTechnologies Inc.
To complete: as long as the Flag Collection is activated in the final setup the FlagsKeys associated to it will replace content in your final code. Use FlagsKeys for a strongly associative Flag-Key-To-Values conversions.
Here the final results when code will be generated. Here you can se both as FLAGS works duplicating group of HAA as much as matching variables FlagsKeys for each instance.
Final code (used debug mode to maintain visible the FLAGS on the left):
								...

								H

								HAA   <!-- image1 -->

								HAA   <img class="image1" src="images/dusk.jpg" alt="Dusk Software">

								HAA   <!-- image2 -->

								HAA   <img class="image2" src="images/Ibs.jpg" alt="Infusible Brain Soft">

								HAA   <!-- image3 -->

								HAA   <img class="image3" src="images/nanotech.jpg" alt="NanoTechnologies Inc.">

								H

								...
In conclusion you can create lists of dynamic variables using FlagsKeys syntax and freely edit and maintain them from the FlagsKeys interface. This of course works for all your languages setup as long as you define lists of objects exposing variables. FlagsKeys Examples: list of images tags, list of mp3 tags played from a site, lists of C# properties in a class, lists of C++ methods in a header, lists of asp.Net labes or TextBox both in page as in codeBehind definition. There are no limits.
Flag Tips
Flags is a powerful feature that greatly influence the code generated. Here some practical Tips to correctly use this function.
- Small Collection: Keep one collection for one or two Flags, no more. Collections must have a descriptive purpose and a small scope
- Two Flags for Iterations: If you have some code that must be duplicated, put in a single collection one flag fixed to 1 instance (ex. H1A), and a second Flag to manage multiple instances (ex. HNA). By this way you will have covered the need to write single header and footer line for repeatable piece code. This happens very frequently in a lot of languages
Example (HTML language):...
H
H1A (single iteration line)
HNA (multiple iteration line)
HNA (multiple iteration line)
HNA (multiple iteration line)
H1A (single iteration line)
H
...
- Use Mnemonic Flags: You can decide, excluded for 1st flag (that always is the 'Language Main Char'), the characters of the 2nd and 3rd flags. Put then the second character to '1' for tracing single instances rows and 'N' for multiple instances rows.
For the 3rd use a mnemonic character you like, such as 'D' if you place for example a DropDown Control, or 'T' for a Textbox.. put something that remember you the purpose of the code.
Example (HTML language):...
H
H1T <!-- START Textbox Area -->
HNT <!-- Insert Textbox nr.€ for control UserInputHNT€ -->
HNT <input id="UserInputHNT€" type="text" value="10" />
H1T <!-- END Textbox Area -->
H
...
- Promote milestone Custom Code to Flags: If a Custom Code is always checked in any program you generate, it is probably a good idea to promote it inside your M.P.S.C. , defining a Flag for it. This increase code maintenance.
- Test Flag Presence: before creating a new flag, verify that it's not already used inside the M.P.S.C. . You can also search inside the Dialog of the button Add Flags to Collection
- Try not to insert duplicated Flags inside Collections: Every Flag should stay in a single collection with a single description. Anyway in some particular cases, for example if you want to keep the setup of a program with specific Flag instances, you will need to create a customized collection for that program, in order to obtain the same result in time
- Default Main Pseudo Source Code gives default Flags to use: If a new Default M.P.S.C. is created, a list of example code will be available for you to use.
Advertising